Tutorial: Rails7, Tailwind and Hotwire - Part 1

In the previous part of this tutorial, I explained how to set up Rails 7, its new options, and how I “dockerized” the PostgreSQL and Redis databases. Now, I’ll focus a bit on Tailwind.
Overall Objective
The goal is to develop (and learn) using Rails 7, esbuild, Tailwind, and Hotwire (Turbo and Stimulus), but my focus will mainly be on the Hotwire package and how it can help us. As I progress through the studies and implementation, I’ll continue to add to this tutorial. For now, we have:
The backdrop is a Kanban-style application, featuring a board where we can include, view, edit, and delete cards/tasks, with simultaneous persistence via websockets for all open sessions of the application. All code is available in this repository. Note that it includes some branches that represent the parts covered here.
Step 1 - Tailwind
In this part, I explain how to use and customize Tailwind. The final result of this step is available in the branch blog-part-1.
A simple scaffold
Before starting to play with HTML and CSS, I generated a simple set of models,
controllers, and views for chores (tasks, small jobs, assignments, etc.).
$ rails generate scaffold chore title:string content:text
Also, a db/seeds.rb so we have something to visualize in the index.
# db/seeds.rb
Chore.create([
  {
    title: "Gave up",
    content: "Would it save you a lot of time if I just gave up and went mad now?",
    created_at: 15.days.ago
  },
  {
    title: "More than big",
    content: "Space is big. You just won't believe how vastly, hugely, mind-bogglingly big it is. I mean, you may think it's a long way down the road to the chemist's, but that's just peanuts to space.",
    created_at: 4.days.ago
  },
  {
    title: "What did happen?",
    content: "For a moment, nothing happened. Then, after a second or so, nothing continued to happen.",
    created_at: 9.days.ago
  },
  {
    title: "About be President",
    content: "Anyone who is capable of getting themselves made President should on no account be allowed to do the job.",
    created_at: 36.days.ago
  },
  {
    title: "UX/UI",
    content: "A common mistake that people make when trying to design something completely foolproof is to underestimate the ingenuity of complete fools",
    created_at: 6.days.ago
  },
  {
    title: "42",
    content: "Forty-two.",
    created_at: 1.days.ago
  },
])
And ran the migrations and seeds.
$ rails db:migrate && rails db:seed
Not configuring Tailwind
Accessing http://localhost:3000/chores should yield something like the following.
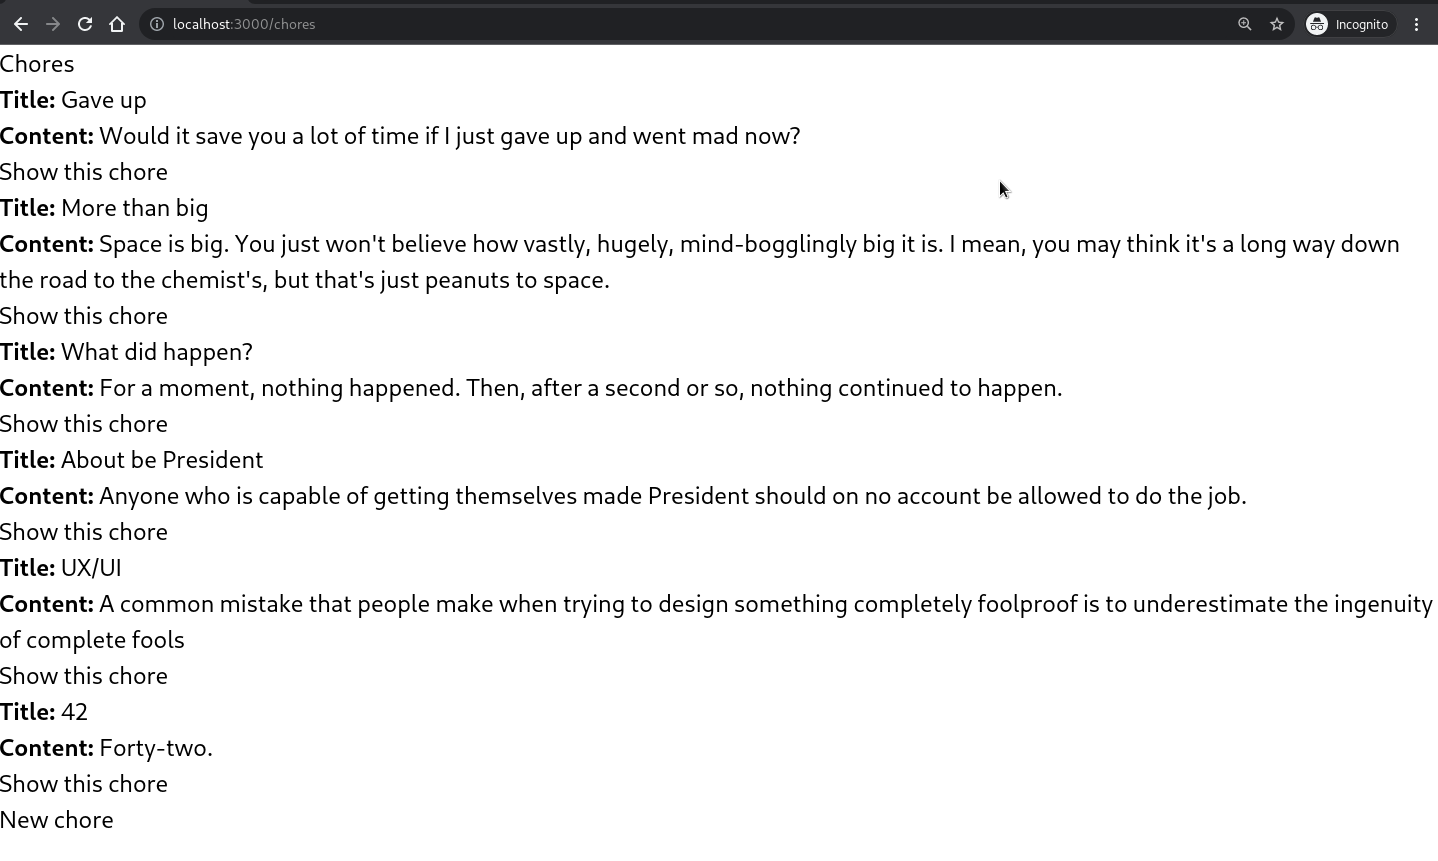
“Huh?” - Me, when I saw this screen.
It seems that Tailwind isn’t configured, but trust me, it is. If you wrap the content with something like
<div class="text-gray-100 bg-gray-900"> ... </div>, which are Tailwind classes, you will see the same page with a
dark background (bg-gray-900) and light text (text-gray-100).
It would look something like this:
<!-- app/views/chores/index.html.erb -->
<div class="text-gray-100 bg-gray-900"
  <p><%= notice %></p>

  <h1>Chores</h1>

  <div id="chores">
    <%= render @chores %>
  </div>

  <%= link_to "New chore", new_chore_path %>
</div>
The issue is that the rails generate scaffold command in Rails 7 doesn’t come with any kind of pre-generated
Tailwind “view scaffolding”, same goes for rails generate controller|view. So, it’s up to us to edit, but Tailwind
is sweet as honey, trust me.
Customizing Tailwind
To customize or include functionalities, just edit the
tailwind.config.js
file at the root of the project. In the
previous part of this tutorial, when we
created the project with the --css tailwind flag, Rails already did the work of installing and referencing the
framework.
UPDATE: At the time of writing this post, version 3 of Tailwind was released and it changed everything I had customized 🤡. I have included the update to the new version in the repository.
I made some customizations to showcase here on the blog, but I recommend reading the official documentation, which is very good indeed.
// tailwind.config.js
module.exports = {
  mode: 'jit',
  content: [ // 'purge' was replaced by 'content' in v3.
    './app/views/**/*.html.erb',
    './app/helpers/**/*.rb',
    './app/javascript/**/*.js'
  ],
  theme: {
    extend: {
      spacing: {
        '100': '25rem',
        '104': '26rem',
        '108': '27rem',
        '112': '28rem',
      },
      colors: {
        wood: {
          50: '#f7eee9',
          100: '#efddd3',
          150: '#e7cdbd',
          200: '#dfbca7',
          250: '#d7ac91',
          300: '#cf9b7b',
          350: '#c78a65',
          400: '#bf7a4f',
          450: '#b76939',
          500: '#af5924',
          550: '#9d5020',
          600: '#8c471c',
          650: '#7a3e19',
          700: '#693515',
          750: '#572c12',
          800: '#46230e',
          850: '#341a0a',
          900: '#231107',
          950: '#110803',
        }
      }
    }
  }
}
Explanation:
First, I included a “manual” set of colors that I named wood, with shades from 50 to 950. This gives you access
to classes like bg-wood-650 (equivalent to background color
#7a3e19), text-wood-300 (equivalent to text color
#cf9b7b), border-wood-850 (equivalent to border color
#341a0a), etc. In the end, I didn’t use these colors
because I thought they all looked like poop colors, but feel free to use them. You can learn more about this
here: https://tailwindcss.com/docs/customizing-colors.
Second, I increased the values for “spacing”. For example, when I set '108': '27rem' within the
spacing: { ... } keys, I have access to classes like p-108 (padding of 27rem), m-108 (margin of 27rem),
h-108 (height of 27rem), etc. You can learn more about this
here: https://tailwindcss.com/docs/customizing-spacing.
I am a lazy designer
Without further ado, after getting tired of decorating the pages spending some time experimenting, I made the
following changes.
In the app/views/chores/index.html.erb:
<!-- app/views/chores/index.html.erb -->
<div class="z-0 flex flex-col justify-start h-screen justify-items-center bg-slate-300">
  <div class="z-0 w-4/5 mx-auto mt-4 overflow-hidden h-2/3 bg-slate-200 rounded-md transition transform duration-600 ease-in-out hover:bg-slate-400 hover:overflow-visible">
    <div id="chores" class="z-0 px-5 pt-1 pb-3 grid grid-cols-3 gap-2">
      <% @chores.each do |chore| %>
        <%= render "chore", chore:chore %>
      <% end %>
    </div>
  </div>
  <div class="w-4/5 mx-auto my-4 h-80 bg-slate-200 rounded-md hover:bg-slate-400 transition duration-600 ease-linear">
    <%= render "form", chore: @chore %>
  </div>
</div>
in the app/views/chores/_chore.html.erb:
<!-- app/views/chores/_chore.html.erb -->
<div
  id="<%= dom_id chore %>"
  class="p-3 my-3 bg-white shadow-lg group transition duration-700 ease-in-out transform hover:scale-125 hover:z-10 rounded-md"
>
  <a href="#">
    <div class="flex flex-col">
      <div class="flex justify-between">
        <p class="text-lg font-semibold leading-snug text-gray-900 mr-0.5">
          <%= chore.title %>
        </p>
        <time
          datetime=<%= chore.created_at.strftime("%Y-%m-%d") %>
          class="invisible text-sm text-indigo-700 group-hover:visible"
        >
          <%= chore.created_at.strftime("%b %d") %>
        </time>
      </div>
        <p class="leading-snug text-gray-900">
          <%= chore.content %>
        </p>
        <div class="flex justify-end space-x-2">
          <button class="invisible w-5 h-5 text-indigo-500 cursor-pointer group-hover:visible hover:text-black transition-all duration-600 ease-in-out">
            <svg stroke="currentColor" fill="none" stroke-width="1.7" viewBox="0 0 24 24" stroke-linecap="round" stroke-linejoin="round">
              <path d="M11 4H4a2 2 0 0 0-2 2v14a2 2 0 0 0 2 2h14a2 2 0 0 0 2-2v-7"/>
              <path d="M18.5 2.5a2.121 2.121 0 0 1 3 3L12 15l-4 1 1-4 9.5-9.5z"/>
            </svg>
          </button>
          <button class="invisible w-5 h-5 text-indigo-500 cursor-pointer group-hover:visible hover:text-black transition-all duration-600 ease-in-out">
            <svg stroke="currentColor" fill="currentColor" stroke-width="0" viewBox="0 0 16 16">
              <path d="M5.5 5.5A.5.5 0 0 1 6 6v6a.5.5 0 0 1-1 0V6a.5.5 0 0 1 .5-.5zm2.5 0a.5.5 0 0 1 .5.5v6a.5.5 0 0 1-1 0V6a.5.5 0 0 1 .5-.5zm3 .5a.5.5 0 0 0-1 0v6a.5.5 0 0 0 1 0V6z"></path><path fill-rule="evenodd" d="M14.5 3a1 1 0 0 1-1 1H13v9a2 2 0 0 1-2 2H5a2 2 0 0 1-2-2V4h-.5a1 1 0 0 1-1-1V2a1 1 0 0 1 1-1H6a1 1 0 0 1 1-1h2a1 1 0 0 1 1 1h3.5a1 1 0 0 1 1 1v1zM4.118 4 4 4.059V13a1 1 0 0 0 1 1h6a1 1 0 0 0 1-1V4.059L11.882 4H4.118zM2.5 3V2h11v1h-11z"/>
            </svg>
          </button>
        </div>
    </div>
  </a>
</div>
and finally in the app/views/chores/_form.html.erb:
<!-- app/views/chores/_form.html.erb -->
<%= form_with(model: chore) do |form| %>
  <% if chore.errors.any? %>
    <div id="error_explanation">
      <h2><%= pluralize(chore.errors.count, "error") %> prohibited this chore from being saved:</h2>

      <ul>
        <% chore.errors.each do |error| %>
          <li><%= error.full_message %></li>
        <% end %>
      </ul>
    </div>
  <% end %>

  <div class="items-center mt-8">
    <div class="flex flex-col w-5/6 mx-auto">
      <%= form.text_field :title, placeholder: "Title", class: "p-3 mt-2 leading-none text-gray-900 bg-gray-100 border border-gray-200 rounded" %>
    </div>
  </div>

  <div class="flex flex-col w-5/6 mx-auto">
    <%= form.text_area :content, placeholder: "Content", class: "h-40 p-3 mt-2 text-base leading-none text-gray-900 bg-gray-100 border border-gray-200 rounded" %>
  </div>

  <div class="flex items-center justify-center w-full">
    <%= form.submit class: "px-10 py-4 my-2 font-semibold leading-none text-white rounded bg-slate-700 hover:bg-slate-900" %>
  </div>
<% end %>
These changes correspond basically to what is in the branch
blog-part-1. So, now if you run the
project with bin/dev and access http://localhost:3000/chores, you should get this result:
And this without a single fucking line of JavaScript and CSS!

How is this possible?!
I’ll try to explain some of the Tailwind classes I included in the HTML that allowed this result.
First, let’s look at the divs that separate the “task board” from the “new task entry” in app/views/chores/index.html.erb. In the div for entry, we have:
<!-- app/views/chores/index.html.erb -->
<div ...>
  ...
  <div class="w-4/5 mx-auto my-4 h-80 bg-slate-200 rounded-md hover:bg-slate-400 transition duration-600 ease-linear">
    <%= render "form", chore: @chore %>
  </div>
</div>
The class bg-slate-200 with hover:bg-slate-400 sets up the mouseover trigger, changing the background color from
“slate-200” to “slate-400” when we hover over it. Adding the transition duration-600 ease-linear set to this
gives us a transition with a gradual effect, more subtle to the eyes. The duration-600 class sets a time of 600
milliseconds for this transition. You can see more about this at
https://tailwindcss.com/docs/transition-timing-function.
In the task board div, we have:
<!-- app/views/chores/index.html.erb -->
<div ...>
  <div class="z-0 w-4/5 mx-auto mt-4 overflow-hidden h-2/3 bg-slate-200 rounded-md transition transform duration-600 ease-in-out hover:bg-slate-400 hover:overflow-visible">
    ...
  </div>
  ...
</div>
The classes bg-slate-200 and overflow-hidden with hover:bg-slate-400 and hover:overflow-visible set up the
mouseover trigger not just to change the color, but also to change the “content overflow” behavior. overflow-hidden
hides tasks that don’t fit in the div (when you resize the browser window, for example), but when you hover over it,
this changes to overflow-visible, making the tasks visible. Again, with the
transition transform duration-600 ease-linear set, we have the gradual transition.
Now let’s look at the tasks, in the file app/views/chores/_chore.html.erb, to explain the effects of “enlarging the task card” and “displaying the edit and delete icons”.
In the outermost div, the first one, we have:
<!-- app/views/chores/_chore.html.erb -->
<div
  ...
  class="p-3 my-3 bg-white shadow-lg group transition duration-700 ease-in-out transform hover:scale-125 hover:z-10 rounded-md"
>
  ...
</div>
With the classes hover:scale-125 and hover:z-10, we set up the trigger to enlarge its size with scale-125 and to
overlay any other content with z-10. I also included the transition transform duration-600 ease-linear set for the
gradual transition. Note that I also included the group class, which is used to map the following part.
In the button tags that wrap the SVGs for the edit and delete icons, we have:
<!-- app/views/chores/_chore.html.erb -->
<div ...>
  <a href="#">
    <div class="flex flex-col">
      ...
      <div ...>
        <!-- botão de edição -->
        <button class="invisible w-5 h-5 text-indigo-500 cursor-pointer group-hover:visible hover:text-black transition-all duration-600 ease-in-out">
          <svg ...>
          </svg>
        </button>
        <!-- botão de remoção -->
        <button class="invisible w-5 h-5 text-indigo-500 cursor-pointer group-hover:visible hover:text-black transition-all duration-600 ease-in-out">
          <svg ...>
          </svg>
        </button>
      </div>
    </div>
  </a>
</div>
With the classes invisible and group-hover:visible on both <button> ... </button>, combined with the group
class that I added to the outermost div, the “parent” of all, as I mentioned before, we tell Tailwind to make both
buttons visible when hovering inside this outermost div, simple as that! This is a group effect. Note that the
individual effect for each button, in this case, changing the icon fill color with text-indigo-500 and
hover:text-black, is different and will be triggered when hovering over the icon individually. You can learn more
about this at
https://tailwindcss.com/docs/hover-focus-and-other-states#styling-based-on-parent-state.
Recommendation: On Adam Wathan’s YouTube channel, there are several recorded live sessions where he builds a layout from scratch with Tailwind, only using HTML, it’s very good!
For now, that’s it.